有两个开源的项目,Open5GS和srsRAN_Project可以非常方便地帮助我们搭建一个5G的基站。在这篇文章中将展示如何在docker中使用Open5GS和srsRAN_Project搭建一个5G基站。
首先我们创建Dockerfile.open5gs
FROM ubuntu:22.04
ENV DEBIAN_FRONTEND=noninteractive
ENV TZ="Asia/Singapore"
RUN ln -snf /usr/share/zoneinfo/$TZ /etc/localtime && echo $TZ > /etc/timezone
RUN apt update && apt -y install ca-certificates curl gnupg git wget
# 安装 mongosh
RUN wget -qO- https://www.mongodb.org/static/pgp/server-8.0.asc | tee /etc/apt/trusted.gpg.d/server-8.0.asc && \
    echo "deb [ arch=amd64,arm64 ] https://repo.mongodb.org/apt/ubuntu jammy/mongodb-org/8.0 multiverse" | tee /etc/apt/sources.list.d/mongodb-org-8.0.list && \
    apt update && apt -y install  mongodb-mongosh
# 安装 Open5GS所需要的依赖
RUN apt -y install ca-certificates curl gnupg python3-pip python3-setuptools python3-wheel ninja-build build-essential flex bison git cmake libsctp-dev libgnutls28-dev \
    libgcrypt-dev libssl-dev libidn11-dev libmongoc-dev libbson-dev libyaml-dev libnghttp2-dev libmicrohttpd-dev libcurl4-gnutls-dev libnghttp2-dev libtins-dev libtalloc-dev meson
# 编译Open5GS
RUN git clone https://github.com/open5gs/open5gs /root/open5gs
WORKDIR /root/open5gs
RUN meson build --prefix=`pwd`/install && ninja -C build
我们再创建一个镜像给srsran,Dockerfile.srsran
FROM ubuntu:22.04
ENV DEBIAN_FRONTEND=noninteractive
ENV TZ="Asia/Singapore"
RUN ln -snf /usr/share/zoneinfo/$TZ /etc/localtime && echo $TZ > /etc/timezone
# 安装srsran所需要的依赖
RUN apt update && apt upgrade -y && apt install -y git nano vim cmake make ninja-build libuhd-dev uhd-host && \
    apt -y install cmake make gcc g++ pkg-config libfftw3-dev libmbedtls-dev libsctp-dev libyaml-cpp-dev libgtest-dev
# 下载uhd所需要的镜像
RUN /usr/bin/uhd_images_downloader
# 获取srsran源码
RUN git clone https://github.com/srsRAN/srsRAN_Project.git /root/srsran
WORKDIR /root/srsran
# 编译srsran
RUN git checkout release_24_04 && cmake -B build -G Ninja && ninja -C build
我们再写一个docker-compose.yml来方便启动Open5GS和srsran, 其中network需要是host,并且需要privileged,因为需要创建ogstun
services:
  open5gs:
    image: open5gs
    build:
      context: .
      dockerfile: Dockerfile.open5gs
    container_name: open5gs
    privileged: true
    command: sleep infinity
    volumes:
      - "./configs:/root/config"
        network_mode: host
    depends_on:
      mongodb:
        condition: service_healthy

  srsran:
    image: srsran
    build:
      context: .
      dockerfile: Dockerfile.srsran
    container_name: srsran
    privileged: true
    command: sleep infinity
    volumes:
      - "/dev/bus/usb/:/dev/bus/usb/"
      - "./configs:/root/config"
    network_mode: host
    depends_on:
      mongodb:
        condition: service_healthy

  mongodb:
    image: mongo:6-jammy
    container_name: mongodb
    restart: unless-stopped
    volumes:
      - dbdata:/data/db
    network_mode: host
    healthcheck:
      test: [ "CMD", "mongosh", "--eval", "db.adminCommand('ping')" ]
      interval: 5s
      timeout: 5s
      retries: 3
      start_period: 5s

volumes:
dbdata:我们先使用docker compose build open5gs srsran来编译open5gs和srsran的镜像。
完成后我们开始配置Open5GS,我们需要先获取一个示例配置文件,首先使用docker run -it --name open5gs open5gs bash启动一个镜像,然后使用docker cp open5gs:/root/open5gs/build/configs/sample.yaml configs/open5gs.yaml将示例配置文件复制到config文件夹中。
将配置文件configs/open5gs.yaml中所有的mcc: 999替换为mcc: 001,将所有mnc: 70替换为mnc: 01。
然后我们开始配置srsran, 其中我们需要把amf>addr换成open5gs中amf的地址127.0.0.5,另外我们还需要将open5gs的amf>tai>tac需要和srsran中的cell_cfg>tac匹配。这里使用的是20MHz的带宽,所有srate使用23.04,若是要使用40MHz,则srate应该使用46.08。
# This example configuration outlines how to configure the srsRAN Project gNB to create a single TDD cell
# transmitting in band 78, with 20 MHz bandwidth and 30 kHz sub-carrier-spacing. A USRP B200 is configured
# as the RF frontend using split 8. Note in this example an external clock source is not used, so the sync
# is not defined and the default is used.

amf:
  addr: 127.0.0.5                                               # The address or hostname of the AMF.
  bind_addr: 127.0.0.1                                            # A local IP that the gNB binds to for traffic from the AMF.

ru_sdr:
  device_driver: uhd                                              # The RF driver name.
  device_args: type=b200,num_recv_frames=64,num_send_frames=64    # Optionally pass arguments to the selected RF driver.
  srate: 23.04                                                    # RF sample rate might need to be adjusted according to selected bandwidth.
  otw_format: sc12
  tx_gain: 80                                                     # Transmit gain of the RF might need to adjusted to the given situation.
  rx_gain: 40                                                     # Receive gain of the RF might need to adjusted to the given situation.

cell_cfg:
  dl_arfcn: 632628                                                # ARFCN of the downlink carrier (center frequency).
  band: 78                                                        # The NR band.
  channel_bandwidth_MHz: 20                                       # Bandwith in MHz. Number of PRBs will be automatically derived.
  common_scs: 30                                                  # Subcarrier spacing in kHz used for data.
  plmn: "00101"                                                   # PLMN broadcasted by the gNB.
  tac: 1                                                          # Tracking area code (needs to match the core configuration).
  pci: 1                                                          # Physical cell ID.

log:
  filename: /tmp/gnb.log                                          # Path of the log file.
  all_level: warning                                                 # Logging level applied to all layers.

pcap:
  mac_enable: false                                               # Set to true to enable MAC-layer PCAPs.
  mac_filename: /tmp/gnb_mac.pcap                                 # Path where the MAC PCAP is stored.
  ngap_enable: false                                              # Set to true to enable NGAP PCAPs.
  ngap_filename: /tmp/gnb_ngap.pcap                               # Path where the NGAP PCAP is stored.
现在我们将Open5GS和srsran都配置好了,我们需要给open5gs创建tun。我们可以使用misc中的脚本
docker exec -it open5gs ./misc/netconf.sh可以看到在执行完成后创建了一个ogstun,使用10.45.0.0/16作为UE使用的ipv4地址。
34: ogstun: <NO-CARRIER,POINTOPOINT,MULTICAST,NOARP,UP> mtu 1500 qdisc fq_codel state DOWN group default qlen 500
    link/none
    inet 10.45.0.1/16 scope global ogstun
       valid_lft forever preferred_lft forever
    inet6 2001:db8:cafe::1/48 scope global
       valid_lft forever preferred_lft forever
此外要想手机连接后能访问上互联网,我们需要配置一下nat。
sudo sysctl -w net.ipv4.ip_forward=1
sudo sysctl -w net.ipv6.conf.all.forwarding=1
sudo iptables -t nat -A POSTROUTING -s 10.45.0.0/16 ! -o ogstun -j MASQUERADE
sudo ip6tables -t nat -A POSTROUTING -s 2001:db8:cafe::/48 ! -o ogstun -j MASQUERADE
sudo iptables -A INPUT -i ogstun -j ACCEPT
sudo iptables -P FORWARD ACCEPT
好了,终于我们可以启动核心网了,使用下面的命令即可
docker exec -it open5gs ./build/tests/app/app -c /root/config/open5gs.yaml当出现Subscription created until字样后,我们启动srsran:
docker exec -it srsran ./build/apps/gnb/gnb -c /root/config/srsran_n78.yaml 当出现==== gNodeB started ===字样,SDR的TXRX LED灯亮起后即启动完成。
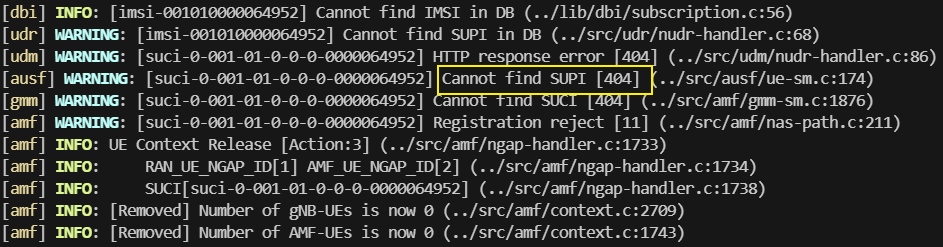
此时我们拿一个插有特制SIM卡的手机,关闭飞行模式即可连接(若是手机并未连接过该频率,可以试试SIM卡信息中>选取运营商来手动搜索一下。若是看到以下输出,则表示SIM卡的信息不在数据库中。
# 四个参数分别为imsi  key  opc  apn
docker exec -it open5gs ./misc/db/open5gs-dbctl add_ue_with_apn 001010000012345 ba1f2511fc30423bdbb183fe33f3dd0f df8b712c4fe20a0df933819665770165 default
手机再次连接时我们就可以看到,Registration complete注册成功。
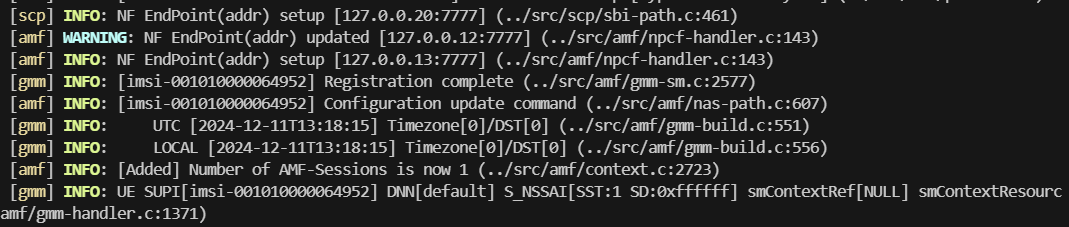
UE SUPI[imsi-001010000064952] DNN[default] IPv4[10.45.0.2] IPv6[]这行告诉我们手机的IP地址是10.45.0.2。

文章评论
文章质量很高啊,啥时候更新一下,想看看Sni5Gect 的更多内容跟细节 哈哈
安排,先挖个坑,有时间写一下
质量很高,来学习啦